
I've been editing video professionally for nearly 8 years now. The key thing that I've learned is that imagination and creativity are essential, but without the tools to bring those ideas to your work in an efficient way, you will find yourself compromising on your ideas in order to stay on budget and meet your deadlines. Since 2006, I've been editing with Apple's Final Cut Pro. This choice was not so much my decision, but rather a choice that was made for me by the studio that hired me as well as it being known as the top choice in video editing on the mac platform at that time. And at the time, it was great, but I quickly found myself looking for features and methods to accomplish certain tasks that simply didn't exists in Final Cut Pro. After using FCP for 7 years, the software was feeling increasingly tired, I was itching for a change, and other options were available.
The main players on the market for video editing are Final Cut, Adobe Premiere Pro and Avid Media Composer. The decision process didn't take long for me. Avid is priced at $999 Canadian, and I had no experience with it in any way, and neither did any of my colleagues, and so I ruled it out immediately.
And then there were 2 choices. Final Cut X with an attractive price tag of $300, or Adobe Creative Cloud.
Final Cut Pro X entered the market to immense criticism. It lacked a plethora of important features as well as backwards compatibility to previous versions of Final Cut. Over the next couple of years, Apple addressed many of the problems, so it did remain a contender for me, but it was up against Adobe's Creative Suite.
Adobe now offers its complete Creative Suite package on subscription basis. They call it Creative Cloud. A fee of $50 per month gives you access to the entire suite with updates and future versions as well as a chunk of cloud storage. Of course, it wouldn't take long for this monthly fee to add up and cost well beyond the price of Final Cut X, however, for that price you are getting the entire Creative Suite. My day to day projects generally have me working in video editing software, as well as image editing, motion graphics and compositing, vector illustration and often page layout as well. Creative Cloud offers all of this, and it is offered in a streamlined package where all the different software components are designed to play well with each other.
Adobe Creative Cloud was the easy winner for me. I purchased, downloaded and installed fairly quickly and began exploring.
This article will be most useful for people who are currently using Final Cut Pro and are thinking about making the switch!
Workflow and integration
I'll being with basic workflow. Adobe Premiere Pro plays very well with After Effects, Photoshop and Illustrator. FCP 7 didn't have a clue what After Effects and Illustrator were, though it understood Photoshop files, but always in a cumbersome way. This alone makes life much simpler for me. Adobe uses a feature called dynamic linking which allows Adobe Premiere Pro to interact with After Effects dynamically. Dynamic linking also extends to Adobe Encore, the DVD authoring component of Creative Suite. Here is how it works; if you are editing a sequence in Adobe Premiere Pro and find that you need to add some effects that are beyond the capabilities of the software, simply select the clips you need to edit in After Effects, and choose to replace with After Effects composition. This will launch After Effects and open a composition with your selected clips from Adobe Premiere Pro laid in the way you had them edited. Meanwhile in Adobe Premiere Pro, your selected clips have been replaced by the After Effects composition that has launched. Do all you need to in After Effects, then save your project, and dynamically, your Adobe Premiere Pro sequence will reflect the changes you made in After Effects. No need to render out a movie from After Effects every time you make a change and import back into Adobe Premiere Pro. For the work I do, this feature can save me hours of rendering time every day. Amazing!

An other bonus with dynamic linking is its integration with Adobe Media Encoder. I often find myself in situations where I need to render out multiple sequences from within one project. With dynamic linking, I can simply import my Premiere Pro project into Media Encoder, and I will be given the option of which (if not all) sequences from within that project I want to render out. This is a great way to quickly setup a batch render and then go about other business. This applies to After Effects compositions as well!

Footage Handling
Next up, let's address native camera footage. Nowadays, nearly all footage I work with comes from a RED, a C300 or a Canon DSLR. All these formats can be natively imported into Adobe Premiere Pro. No need for transcoding! I am often filming trips, where I shoot all day and edit in the evenings to upload videos overnight. The ability to backup my footage and then edit immediately saves me hours of transcoding, and on days when I only return to my hotel at 9:00pm or 10:00pm, the time saved is invaluable! With respect to RED footage, R3D files can be imported into Adobe Premiere Pro allowing base level colour correction and editing without having to use REDCine. A very nice touch.
Aside from the way Premiere can effortlessly import media from a variety of sources, it reads memory cards from cameras very well. Adobe Premiere Pro has a panel called the media browser, not to be confused with the project panel which houses all the media that has been imported in to your project. On the surface this appears to present itself as something similar to a finder window embedded into Adobe Premiere Pro, however it it much more helpful than that. Most digital footage sources on memory cards are nested within a series of folders. The Media Browser cuts through the clutter and gets you right to your footage. Rather than having to sift through multiple layers of folders to find your clips, once you select the memory card root folder, all your clips are present for browsing. This is particularly helpful with RED and C300/500 footage. A big time saver (and an annoyance saver). As an added bonus, the media browser has a drop down where you can select a particular type of file to find the content on your hard drive that you are looking for quickly, be it .r3d files, .png files, or many others.
Media Bin
An other nice feature of Adobe Premiere Pro is the Media Bin. When viewing clips in the thumbnail view, you can scale up the size of the thumbnails to about 650 pixels wide. When scaling down, they reach about 100 pixels wide. This is a giant leap from FCP, where there are only 3 size options, with the largest being under 100 pixels wide.
When moving your mouse over a clip, you can see how it progresses, with the left hand side of the clip being the start and the right being the end. You can also click a clip and press the space bar to play the clip directly in the thumbnail. Of course, you have the option to open the clip in the source window (known as viewer in FCP) as well.
My criticism of Adobe Premiere Pro's Media Bin is as follows; When in the thumbnail view, sorting is done manually as if you were creating a storyboard from all your clips. It lacks the ability to 'sort' clips by name, date, etc. I think this is a big miss by Adobe.

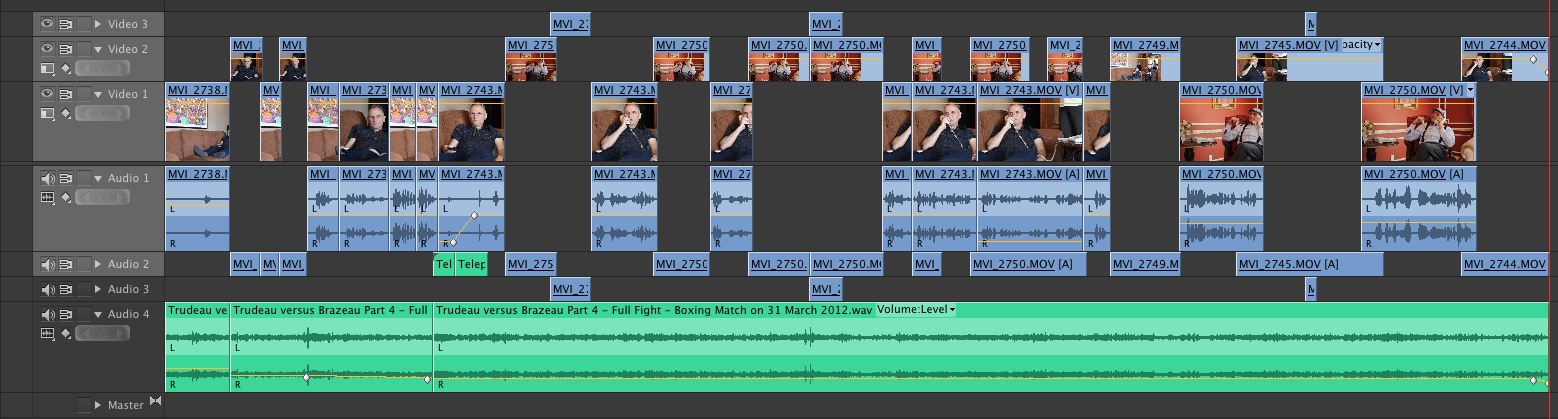
Timeline Panel
Adobe Premiere Pro's timeline panel offer a number of features I find very helpful. Tracks, both audio and video, can be given custom names to keep things organized. The height of each track on the timeline can also be adjusted, so that way you can focus on the tracks you are currently working on and make all others smaller, or toggle them down all together. One small criticism that I have to Adobe Adobe Premiere Pro is snapping on the timeline. Clips snap nicely at some times, but it seems inconsistent. The snapping functionality, in my experience doesn't always work the way you would expect.
Titling
One of the things that upset me the most about FCP7 was working with titles. Final Cut lacked flexibility and control. It blocked out font subsets and wasn't able to allow for multiple styles within one title. To achieve anything more than a very basic title, a third party plug was needed. Adobe Premiere handles all this beautifully and adds to ability to add shapes within the native titler. The main functional difference in Adobe Premiere Pro is that every title you create is stored in your project as a different file, so you have to be careful not to make changes to one because it will change your original. You will need to duplicate the title first before making changes. This is an extra step however it is a small price to pay for all the added features and functionality that comes with Adobe Adobe Premiere Pro titler.

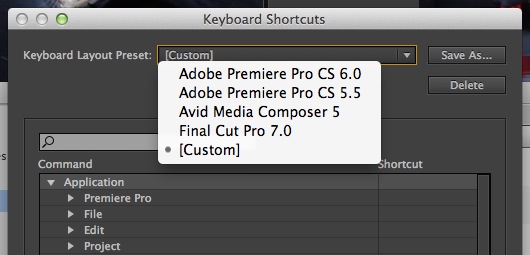
Keyboard Shortcuts
I use After Effects in equal proportions to my video editing software. Within After Effects, I am very comfortable with using keyboard shortcuts to speed up my workflow. Having Adobe Premiere Pro using mostly the same shortcuts makes things much quicker. Final Cut used its own set of shortcuts and switching between the two always led to me hitting the wrong shortcut. If however, you are comfortable with the Final Cut shortcuts, or even Avid for that matter, Adobe Premiere Pro has an option to configure the shortcuts to act as they would in FCP or Avid Media Composer.
For all the above reasons amongst other, I am very satisfied with my decision to make the switch from Apple's Final Cut Studio to Adobe Creative Suite.
If you have any questions, please feel free to get in touch with me by email or on Facebook.